なんとなく、パターンというものがありそうです。
表のセルにコンポーネントを埋め込むための処理はテンプレ化できそうだね〜
JUCEチュートリアル、「Interface Design」、「The TableListBox class」チュートリアルです。今回は、チュートリアルの続きである「Custom Cell Components」項目の「Selectable Button」をやっていきます。
公式のチュートリアルページはこちらになります。
https://docs.juce.com/master/tutorial_table_list_box.html
こんな人の役に立つかも
・JUCEプログラミングを勉強している人
・JUCEチュートリアル「The TableListBox class」をやっている人
・JUCEの表に、チェックボックスを埋め込みたい人
実装の概要
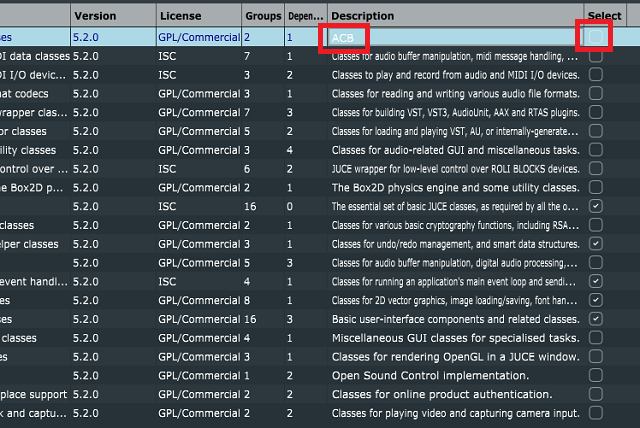
前回は、Descriptionの入力可能なテキストを作成しましたが、今回はスクショの右の赤枠、Select列にチェックボックスのようなコンポーネントを埋め込んでいきます。

SelectionColumnCustomComponentクラスの作成
TableTutorialComponentクラスのインナークラスとして、Componentクラスを継承した「SelectionColumnCustomComponent」クラスを作成していきます。
前回と同様、C++のインナークラス(内部クラス)として作成していきます。
class TableTutorialComponent : public juce::Component,
    public juce::TableListBoxModel
{
public:
//...略...

    //[1]以下の内部クラスを追加しました。
    class SelectionColumnCustomComponent : public Component
    {
    public:
        //[3]コンストラクタです。
        SelectionColumnCustomComponent(TableTutorialComponent& td)
            : owner(td)
        {
            addAndMakeVisible(toggleButton);

            toggleButton.onClick = [this] { owner.setSelection(row, (int)toggleButton.getToggleState()); };
        }

        //[4]表への配置を行います。
        void resized() override
        {
            toggleButton.setBoundsInset(juce::BorderSize<int>(2));
        }

        //[5]toggleButtonの状態を変化させます。
        void setRowAndColumn(int newRow, int newColumn)
        {
            row = newRow;
            columnId = newColumn;
            toggleButton.setToggleState((bool)owner.getSelection(row), juce::dontSendNotification);
        }

    private:
        //[2]以下のprivateなメンバを定義します。
        TableTutorialComponent& owner;
        juce::ToggleButton toggleButton;
        int row, columnId;
    };
//...略...
このクラスは、Componentクラスを継承しているので、見慣れた構成になっています。
[1]のように、TableTutorialComponentクラスの内部クラスとしてSelectionColumnCustomComponentを定義します。[2]のように、ownerはTableTutorialComponentのポインタを受けとるため必要で、一つのtoggleButtonクラスをもち、int型の変数、rowとcolumnIdを定義します。
[3]のコンストラクタでは、toggleButtonを可視化して、ラムダ式でクリックされた時の処理を定義しています。ここでは、後ほど定義するsetSelection関数を呼び出しています。
[4]では、resized関数でtoggleButtonを配置しています。setBoundsInset関数で、周囲に引数のピクセル分余白を残した位置とサイズでコンポーネントが配置されます。
[5]のsetRowAndColumn関数では、toggleButton自体の状態を反映させる処理になります。後ほど定義するdataListからデータを取得するgetSelection関数も利用しています。
SelectionColumnCustomComponentの利用
refreshComponentForCell関数に以下[1]の処理を追加して、表の列、9項目のselectの時にSelectionColumnCustomComponentクラスを生成するようにします。
    Component* refreshComponentForCell(int rowNumber, int columnId, bool /*isRowSelected*/ ,
        Component* existingComponentToUpdate) override
    {

        //[1]以下の処理を追加しました。
        if (columnId == 9)
        {

            //[2]すでにコンポーネントが存在している場合、selectionBoxに何かしらのポインタが入ります。
            auto* selectionBox = static_cast<SelectionColumnCustomComponent*> (existingComponentToUpdate);

            //[3]先ほど、コンポーネントがnullptrの場合のみ新規に生成します。
            if (selectionBox == nullptr)
                selectionBox = new SelectionColumnCustomComponent(*this);

            //[4]セルのtoggleButtonに状態を反映します。
            selectionBox->setRowAndColumn(rowNumber, columnId);
            return selectionBox;
        }


        if (columnId == 8)
//...略...
[2]では、すでにセル内にコンポーネントが存在しているか、を取得します。存在している場合、SelectionColumnComponentクラスのオブジェクトのポインタがここで取得され、SelectionBoxに格納されます。存在していない場合(初回の実行時)[3]でSelectionColumnComponentをnewでインスタンス化します。
[4]は、毎回実行される処理で、SelectionBoxの状態設定します。setRowAndColumn関数を呼び出すことで、dataListから値を読み出し、toggleButtonに反映させます。
その他のヘルパー関数を実装
TableTutorialComponentクラスのpublicな関数として次の関数を定義します。
    //[1]dataListからSelectのデータを取得します。
    int getSelection(const int rowNumber) const
    {
        return dataList->getChildElement(rowNumber)->getIntAttribute("Select");
    }
    //[2]dataListに新しい値を書き込みます。
    void setSelection(const int rowNumber, const int newSelection)
    {
        dataList->getChildElement(rowNumber)->setAttribute("Select", newSelection);
    }
この2つの関数は、XmlElementクラスのオブジェクトであるdataListとデータを読み書きする関数になります。[1]は行番号を引数として与えて、任意の行番号の「Select」の属性のデータをdataListから取得してint型で返します。
[2]のsetSelectionはXmlElementクラスの関数、setAttribute関数で、dataListに値を書き込みます。

