まずはアプリが動くことと、どんな動作をするのか、実際に確認です。
これから見ていくプログラムがどんな風に動作するのか知ることがまずは重要ですね~
JUCEプログラミング、Audioチュートリアルの「Looping audio using the AudioSampleBuffer class」の項目を進めていきます。今回は、動作するアプリをサンプルプログラムをもとに実装していきます。基本的には、チュートリアルページからダウンロードできる「LoopingAudioSampleBufferTutorial_01.h」を参考にしています。
この記事では、Projucerで作成するAudioテンプレートから「.h」と「.cpp」に実装していきますので、C++に慣れていない方への実装方法の参考になればと思います。基本的にコピペで動作するような形になっています。
公式チュートリアルはこちらになります。
こんな人の役に立つかも
・JUCEフレームワークに入門したい人
・JUCEで音声プログラミングを学びたい人
・JUCEのAudioチュートリアルを進めている人
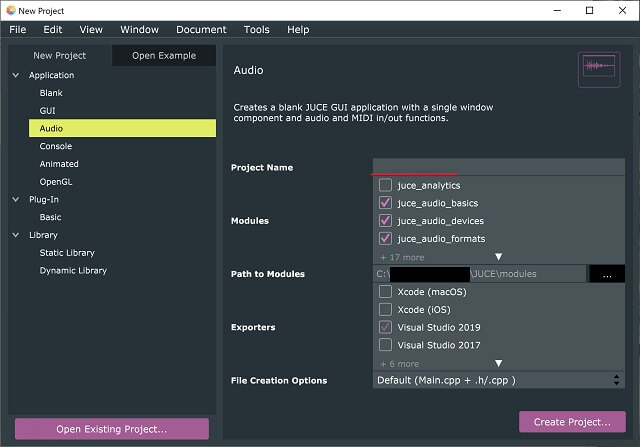
プロジェクトの準備
ProjucerでAudioの枠組みを選択し、ProjectNameに「LoopingAudioSampleBuffer01」と名付けました。
MainComponent.h
MainComponent.hのprivateなメンバに次のものを追加しました。
private:
    //ボタンをクリックしたときに呼び出される関数のプロトタイプ宣言です。
    void openButtonClicked();
    void clearButtonClicked();

    //ボタンオブジェクトを定義しておきます。
    juce::TextButton openButton;
    juce::TextButton clearButton;

    //音声を扱う各種クラス、変数を準備しておきます。
    juce::AudioFormatManager formatManager;
    juce::AudioSampleBuffer fileBuffer;
    int position;

    JUCE_DECLARE_NON_COPYABLE_WITH_LEAK_DETECTOR (MainComponent)
};
今回、音声を扱うためのクラスは、AudioFormatManagerクラスとAudioSampleBufferクラス、また、音声のサンプル位置を示すposition変数となっています。AudioSampleBufferクラスは、AudioBuffer<float>の別名として定義されていますので、実態はAudioBufferクラスになります。
MainComponent.cpp
コンストラクタ
コンストラクタでは、次のようにボタンの初期化を行います。
MainComponent::MainComponent()
{
    //[1]openボタンの初期化です。
    addAndMakeVisible(openButton);
    openButton.setButtonText("Open...");
    openButton.onClick = [this] { openButtonClicked(); };

    //[2]clearボタンの初期化です。
    addAndMakeVisible(clearButton);
    clearButton.setButtonText("Clear");
    clearButton.onClick = [this] { clearButtonClicked(); };

    setSize(300, 200);

    formatManager.registerBasicFormats();
}
[1]と[2]で、それぞれボタンの可視化と、ボタンテキストの配置、ラムダ式による、コールバック関数の設定を行います。ここは、以前のAudioPlayerと同じような実装ですね。
getNextAudioBlock関数
今回のチュートリアルで一番重要な場所です。とりあえず次のプログラムで動作しますので、今はコピペで動作させておきます。
void MainComponent::getNextAudioBlock (const juce::AudioSourceChannelInfo& bufferToFill)
{
    auto numInputChannels = fileBuffer.getNumChannels();
    auto numOutputChannels = bufferToFill.buffer->getNumChannels();

    auto outputSamplesRemaining = bufferToFill.numSamples;                                  // [8]
    auto outputSamplesOffset = bufferToFill.startSample;                                    // [9]

    while (outputSamplesRemaining > 0)
    {
        auto bufferSamplesRemaining = fileBuffer.getNumSamples() - position;                // [10]
        auto samplesThisTime = juce::jmin(outputSamplesRemaining, bufferSamplesRemaining); // [11]

        for (auto channel = 0; channel < numOutputChannels; ++channel)
        {
            bufferToFill.buffer->copyFrom(channel,                                         // [12]
                outputSamplesOffset,                             //  [12.1]
                fileBuffer,                                      //  [12.2]
                channel % numInputChannels,                      //  [12.3]
                position,                                        //  [12.4]
                samplesThisTime);                                //  [12.5]
        }

        outputSamplesRemaining -= samplesThisTime;                                          // [13]
        outputSamplesOffset += samplesThisTime;                                             // [14]
        position += samplesThisTime;                                                        // [15]

        if (position == fileBuffer.getNumSamples())
            position = 0;                                                                   // [16]
    }
}
releaseResources関数
この関数も今回の音声処理に関わってきそうです。cppに追加しておきましょう。
void MainComponent::releaseResources()
{
    fileBuffer.setSize(0, 0);
}
resized関数
ボタンをGUIに配置する関数です。
void MainComponent::resized()
{
    openButton.setBounds(10, 10, getWidth() - 20, 20);
    clearButton.setBounds(10, 40, getWidth() - 20, 20);
}
ボタンコールバック関数
openボタンのコールバック
openボタンが押されたときに動作する関数です。この関数も音声処理に関係してきそうです。
void MainComponent::openButtonClicked()
{
    shutdownAudio();                                                                            // [1]

    juce::FileChooser chooser("Select a Wave file shorter than 2 seconds to play...",
        {},
        "*.wav");

    if (chooser.browseForFileToOpen())
    {
        auto file = chooser.getResult();
        std::unique_ptr<juce::AudioFormatReader> reader(formatManager.createReaderFor(file)); // [2]

        if (reader.get() != nullptr)
        {
            auto duration = (float)reader->lengthInSamples / reader->sampleRate;               // [3]

            if (duration < 2)
            {
                fileBuffer.setSize((int)reader->numChannels, (int)reader->lengthInSamples);  // [4]
                reader->read(&fileBuffer,                                                      // [5]
                    0,                                                                //  [5.1]
                    (int)reader->lengthInSamples,                                    //  [5.2]
                    0,                                                                //  [5.3]
                    true,                                                             //  [5.4]
                    true);                                                            //  [5.5]
                position = 0;                                                                   // [6]
                setAudioChannels(0, (int)reader->numChannels);                                // [7]
            }
            else
            {
                // handle the error that the file is 2 seconds or longer..
            }
        }
    }
}
clearボタンのコールバック
clearボタンが押されたときに動作する関数です。単純にshutdownAudio関数を呼び出しているだけです。
void MainComponent::clearButtonClicked()
{
    shutdownAudio();
}
まずは、アプリをビルドしてみて、実際にどんな動作をするのか、確認してみるのが一番重要だと思います。
次回から、音声処理や、ボタンクリック時の関数の中身など、詳細に中身を見ていきたいと思います。