今までのプログラムを動作させてみます。
動くといいね、どきどきするね。
JUCEチュートリアルの音声処理を数珠繋ぎするプラグインチュートリアルを進めています。今回は、AudioProcessorGraphクラスで作成したそれぞれの音声処理クラスをノードとして接続をして、実際に動作を確認する、ということをやっていきます。
現在進めているチュートリアルページはこちらの「Connecting graph nodes together」となります。

こんな人の役に立つかも
・JUCEフレームワークに入門したい人
・VST、AUプラグイン開発の最初の一歩を踏み出したい人
・JUCEのチュートリアルをやっている人
パラメータの初期化と追加
「PluginProcessor.h」に以下のprivateなメンバ変数を追加します。
    //①文字列の配列です。
    juce::StringArray processorChoices{ "Empty", "Oscillator", "Gain", "Filter" };

    //②必要なパラメータの定義をします。
    juce::AudioParameterBool* muteInput;

    juce::AudioParameterChoice* processorSlot1;
    juce::AudioParameterChoice* processorSlot2;
    juce::AudioParameterChoice* processorSlot3;

    juce::AudioParameterBool* bypassSlot1;
    juce::AudioParameterBool* bypassSlot2;
    juce::AudioParameterBool* bypassSlot3;

    //③ノードへのポインタを定義します。
    Node::Ptr slot1Node;
    Node::Ptr slot2Node;
    Node::Ptr slot3Node;

    std::unique_ptr<juce::AudioProcessorGraph> mainProcessor;

    Node::Ptr audioInputNode;
    Node::Ptr audioOutputNode;
    Node::Ptr midiInputNode;
    Node::Ptr midiOutputNode;

    //==============================================================================
    JUCE_DECLARE_NON_COPYABLE_WITH_LEAK_DETECTOR(CascadePluginAudioProcessor)
};
入力音声をミュートにするかどうかのフラグ「muteInput」をAudioParameterBoolクラスで定義、その他にも、AudioParameterChoiceというリストからパラメータを選択できるようなクラスでエフェクトのスロット1〜3のポインタを定義しています。ノードへのポインタは、入出力と同様に、「Node::Ptr」クラスで定義しています。
「PluginProcessor.cpp」に記載しているコンストラクタで、先ほど定義したメンバ変数の初期化を行います。
CascadePluginAudioProcessor::CascadePluginAudioProcessor()
//changed
    : AudioProcessor(BusesProperties().withInput("Input", juce::AudioChannelSet::stereo(), true)
        .withOutput("Output", juce::AudioChannelSet::stereo(), true)),
    mainProcessor(new juce::AudioProcessorGraph()),
//↓ここから追記した初期化になります。
muteInput(new juce::AudioParameterBool("mute", "Mute Input", true)),
processorSlot1(new juce::AudioParameterChoice("slot1", "Slot 1", processorChoices, 0)),
processorSlot2(new juce::AudioParameterChoice("slot2", "Slot 2", processorChoices, 0)),
processorSlot3(new juce::AudioParameterChoice("slot3", "Slot 3", processorChoices, 0)),
bypassSlot1(new juce::AudioParameterBool("bypass1", "Bypass 1", false)),
bypassSlot2(new juce::AudioParameterBool("bypass2", "Bypass 2", false)),
bypassSlot3(new juce::AudioParameterBool("bypass3", "Bypass 3", false))
{
    //パラメータを追加します。
    addParameter(muteInput);

    addParameter(processorSlot1);
    addParameter(processorSlot2);
    addParameter(processorSlot3);

    addParameter(bypassSlot1);
    addParameter(bypassSlot2);
    addParameter(bypassSlot3);
}
ノードのアップデート処理
今回のプラグインは、ノードの接続順序があり、GUIで順序を変更したら、ノードの接続順が変更されるというような処理が必要になります。(GUIを実装すると、DAWのようにエフェクトの接続順を変更できる、ということのようです。)チュートリアルでは、「UpdateGraph」という関数を定義することで、ノードの接続関係に変更があった場合、更新されるような処理が実装されます。
以前、processBlockでコメントアウトした「updateGraph」関数を有効にします。
//changed
void CascadePluginAudioProcessor::processBlock(juce::AudioBuffer<float>& buffer, juce::MidiBuffer& midiMessages)
{
    for (int i = getTotalNumInputChannels(); i < getTotalNumOutputChannels(); ++i)
        buffer.clear(i, 0, buffer.getNumSamples());

    //↓ここのコメントアウトを外しました。
    updateGraph();

    mainProcessor->processBlock(buffer, midiMessages);
}
次にupdateGraph関数を実装します。とても中身が長い関数ですので、まずは動作しているところをみたいので、コピペします。
「PluginProcessor.cpp」のPrivateなメンバ関数、「initializeGraph」関数のすぐ下に次のような「updateGraph」関数を定義しました。
    void updateGraph()
    {
        bool hasChanged = false;

        juce::Array<juce::AudioParameterChoice*> choices{ processorSlot1,
                                                           processorSlot2,
                                                           processorSlot3 };

        juce::Array<juce::AudioParameterBool*> bypasses{ bypassSlot1,
                                                          bypassSlot2,
                                                          bypassSlot3 };

        juce::ReferenceCountedArray<Node> slots;
        slots.add(slot1Node);
        slots.add(slot2Node);
        slots.add(slot3Node);

        for (int i = 0; i < 3; ++i)
        {
            auto& choice = choices.getReference(i);
            auto  slot = slots.getUnchecked(i);

            if (choice->getIndex() == 0)            // [1]
            {
                if (slot != nullptr)
                {
                    mainProcessor->removeNode(slot.get());
                    slots.set(i, nullptr);
                    hasChanged = true;
                }
            }
            else if (choice->getIndex() == 1)       // [2]
            {
                if (slot != nullptr)
                {
                    if (slot->getProcessor()->getName() == "Oscillator")
                        continue;

                    mainProcessor->removeNode(slot.get());
                }

                slots.set(i, mainProcessor->addNode(std::make_unique<OscillatorProcessor>()));
                hasChanged = true;
            }
            else if (choice->getIndex() == 2)       // [3]
            {
                if (slot != nullptr)
                {
                    if (slot->getProcessor()->getName() == "Gain")
                        continue;

                    mainProcessor->removeNode(slot.get());
                }

                slots.set(i, mainProcessor->addNode(std::make_unique<GainProcessor>()));
                hasChanged = true;
            }
            else if (choice->getIndex() == 3)       // [4]
            {
                if (slot != nullptr)
                {
                    if (slot->getProcessor()->getName() == "Filter")
                        continue;

                    mainProcessor->removeNode(slot.get());
                }

                slots.set(i, mainProcessor->addNode(std::make_unique<FilterProcessor>()));
                hasChanged = true;
            }
        }

        if (hasChanged)
        {
            for (auto connection : mainProcessor->getConnections())     // [5]
                mainProcessor->removeConnection(connection);

            juce::ReferenceCountedArray<Node> activeSlots;

            for (auto slot : slots)
            {
                if (slot != nullptr)
                {
                    activeSlots.add(slot);                             // [6]

                    slot->getProcessor()->setPlayConfigDetails(getMainBusNumInputChannels(),
                        getMainBusNumOutputChannels(),
                        getSampleRate(), getBlockSize());
                }
            }

            if (activeSlots.isEmpty())                                  // [7]
            {
                connectAudioNodes();
            }
            else
            {
                for (int i = 0; i < activeSlots.size() - 1; ++i)        // [8]
                {
                    for (int channel = 0; channel < 2; ++channel)
                        mainProcessor->addConnection({ { activeSlots.getUnchecked(i)->nodeID,      channel },
                                                        { activeSlots.getUnchecked(i + 1)->nodeID,  channel } });
                }

                for (int channel = 0; channel < 2; ++channel)           // [9]
                {
                    mainProcessor->addConnection({ { audioInputNode->nodeID,         channel },
                                                    { activeSlots.getFirst()->nodeID, channel } });
                    mainProcessor->addConnection({ { activeSlots.getLast()->nodeID,  channel },
                                                    { audioOutputNode->nodeID,        channel } });
                }
            }

            connectMidiNodes();

            for (auto node : mainProcessor->getNodes())                 // [10]
                node->getProcessor()->enableAllBuses();
        }

        for (int i = 0; i < 3; ++i)
        {
            auto  slot = slots.getUnchecked(i);
            auto& bypass = bypasses.getReference(i);

            if (slot != nullptr)
                slot->setBypassed(bypass->get());
        }

        audioInputNode->setBypassed(muteInput->get());

        slot1Node = slots.getUnchecked(0);
        slot2Node = slots.getUnchecked(1);
        slot3Node = slots.getUnchecked(2);
    }
何となく、Nodeの接続を行っているのが見受けられます。具体的な中身はまた改めてみていきたいと思います。
動作検証
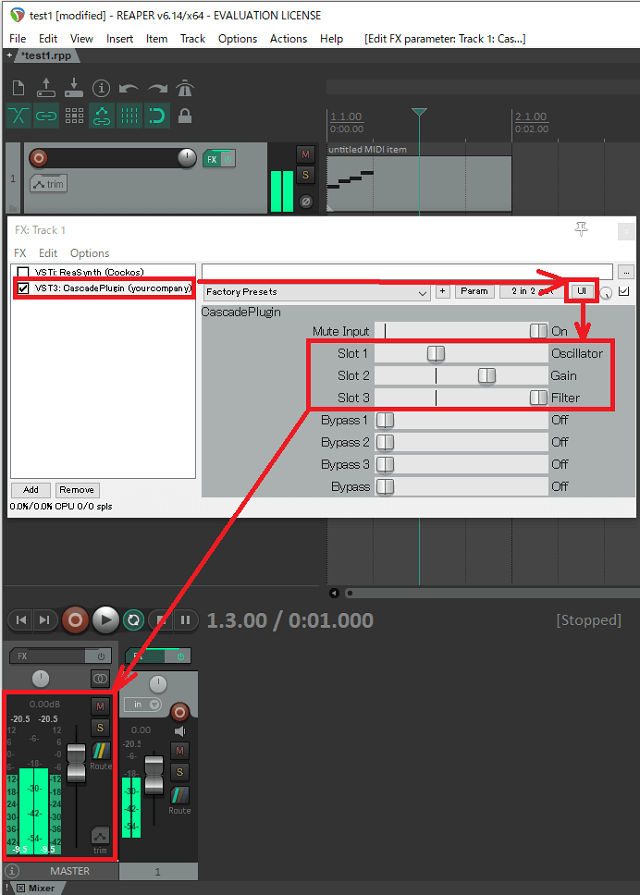
DAWにてVST3を読み込みます。今回、EditorクラスにてGUIを実装していないので、次のように、パラメータを直接いじる画面にてプラグインパラメータを設定します。
※SlotにOscillatorを入れるときは、音量に注意してください。あらかじめDAWまたはオーディオインターフェースなどの出力を絞ってからSlotをオシレータに合わせるのが良いです。

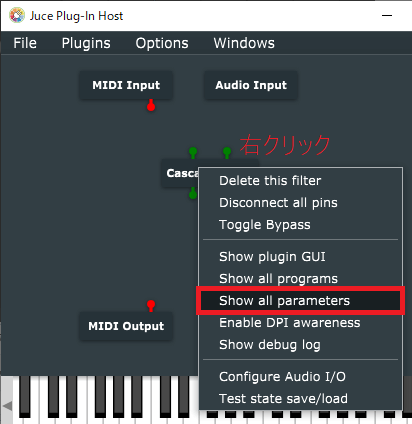
私は、今回動作検証にはReperという無料のDAWを利用しました(60日間無料)が、以前ビルドしたJucePlugin-Hostアプリでも同様に音を確認することができます。この時もSlotにオシレータを入れたときの音量には気を付けてください。

これで、スロットに「Gain」を入れると6デシベル音量が下がり、「Filter」を入れると1kHzをカットオフ周波数としたハイパスフィルターが入ります。

