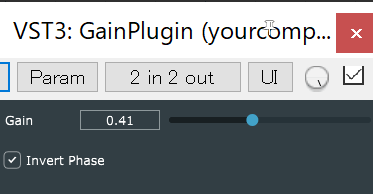
最後のGUIを作成する部分をやっていきます。以前作成したゲインプラグインでは、GUIを実装するところまでなかったので、とても気になっていました。
やっと一つの体裁の整ったプラグインができあがるね~
JUCEチュートリアルの「Tutorial: Saving and loading your plug-in state」を進めています。今回はGUIの作成部分「The gain editor」の項目を進めていきます。AudioProcessorValueTreeStateクラスを利用することの、最もメリットを感じられる項目にもなっています。
チュートリアルのページは次のページとなります。
こんな人の役に立つかも
・JUCEフレームワークに入門したい人
・VST、AUプラグイン開発の最初の一歩を踏み出したい人
・JUCEのチュートリアルをやっている人
Editorクラスのプログラミング
JUCEプログラミングでは、音声バッファの処理を行うProcessorクラスとGUI描画処理を行うEditorクラスに分離してプログラミングを行うというのが基本らしいです。今回は、GUIの実装部分である「PluginEditor.h」と「PluginEditor.cpp」に対するプログラミングを行い、ゲインプラグインのGUIを作成していきます。(正直、チュートリアルではシンプルにするため、.hソースコード一つにまとめて提供していますが、最初にあえてクラスを分離してプログラミングしているのに、.hにまとめてプログラムを提供するという、、、個人的にはこの点が結構チュートリアルを読むうえで混乱しました。)
enumで定数の定義
チュートリアルでは飛ばされていたのですが、以下のenumを最初に定義しておく必要があります。
以下のように「PluginEditor.h」にpublicでenumを定義しました。
(2021/05/06追記PluginProcessor.hと記載ミスしていました、失礼しました。)
class GainPluginAudioProcessorEditor  : public juce::AudioProcessorEditor
{
public:
    enum
    {
        paramControlHeight = 40,
        paramLabelWidth = 80,
        paramSliderWidth = 300
    };
//...以下略...
typedefで長い定義をショートカット
次に、「PluginEditor.h」に以下のようにtypedefでデータ型を定義します。
public:
    enum
    {
        paramControlHeight = 40,
        paramLabelWidth = 80,
        paramSliderWidth = 300
    };
    //先のenumの下に追記しました。
    typedef juce::AudioProcessorValueTreeState::SliderAttachment SliderAttachment;
    typedef juce::AudioProcessorValueTreeState::ButtonAttachment ButtonAttachment;
typedefでデータ型を定義できます。今後たくさん使う「juce::AudioProcessorValueTreeState::SliderAttachment」というデータ型を「SliderAttachment」として再定義し、後から使うときに短い文字数で済むように済むようにしています。「ButtonAttachment」型も同様に再定義された型になります。
SliderAttachmentクラスは、SliderクラスとAudioProcessorValueTreeStateクラスのパラメータをの紐づけを行うようなクラスになります。
privateなメンバ
「PluginEditor.h」にprivateなメンバを定義していきます。
private:
    //↓消しました。
    //GainPluginAudioProcessor& audioProcessor;

    juce::AudioProcessorValueTreeState& valueTreeState;

    juce::Label gainLabel;
    juce::Slider gainSlider;
    std::unique_ptr<SliderAttachment> gainAttachment;

    juce::ToggleButton invertButton;
    std::unique_ptr<ButtonAttachment> invertAttachment;

    JUCE_DECLARE_NON_COPYABLE_WITH_LEAK_DETECTOR(GainPluginAudioProcessorEditor)
};
今回AudioProcessorValueTreeStateクラスの、「valueTreeState」という名前でメンバ変数を作成しています。
また、GUIのオブジェクトのLabelやSlider、ToggleButtonをそれぞれ作成して、SliderとToggleButtonに関しては、AudioProcessorValueTreeStateと紐づけるため、先ほどtypedefした型で「gainAttachment」と「invertAttachment」というメンバ変数を作成しています。
Editorのコンストラクタ
「ProcessorEditor.h」のコンストラクタの定義を以下のように書き換えました。
   //コンストラクタを書き換えました。
    //GainPluginAudioProcessorEditor (GainPluginAudioProcessor&);
    GainPluginAudioProcessorEditor(juce::AudioProcessor& parent, juce::AudioProcessorValueTreeState& vts);
    ~GainPluginAudioProcessorEditor() override;
コンストラクタの実態は「PluginEditor.cpp」に記述しますが、そのためのコンストラクタのプロトタイプ宣言を.hにする必要がありますので、その記載方法をAudioProcessorTreeStateを使った方法に変更しています。
「PluginEditor.h」のコンストラクタの処理は次のように記載します。
//GainPluginAudioProcessorEditor::GainPluginAudioProcessorEditor (GainPluginAudioProcessor& p)
//   : AudioProcessorEditor (&p), audioProcessor (p)
//{
    // Make sure that before the constructor has finished, you've set the
    // editor's size to whatever you need it to be.
//    setSize (400, 300);
//}

//↑以前のコンストラクタになります。
//↓新しく定義したコンストラクタです。
GainPluginAudioProcessorEditor::GainPluginAudioProcessorEditor(juce::AudioProcessor& parent, juce::AudioProcessorValueTreeState& vts)
    : AudioProcessorEditor(parent),
    valueTreeState(vts)
{
    gainLabel.setText("Gain", juce::dontSendNotification);
    addAndMakeVisible(gainLabel);

    addAndMakeVisible(gainSlider);
    gainAttachment.reset(new SliderAttachment(valueTreeState, "gain", gainSlider));

    invertButton.setButtonText("Invert Phase");
    addAndMakeVisible(invertButton);
    invertAttachment.reset(new ButtonAttachment(valueTreeState, "invertPhase", invertButton));

    //setSize(paramSliderWidth + paramLabelWidth, juce::jmax(100, paramControlHeight * 2));
    setSize(400, 300);
}
ProcessorからEditorの生成
「PluginProcessor.cpp」の「createEditor」メソッドで、GUIの「PluginEditor」をnewしています。
juce::AudioProcessorEditor* GainPluginAudioProcessor::createEditor()
{
    //return new GainPluginAudioProcessorEditor (*this);
    //↓以下のようにAudioProcessorValueTreeStateクラスのprametersを渡してEditorクラスをnewします。
    return new GainPluginAudioProcessorEditor(*this, parameters);
}
先ほどのPluginEditor.cppのコンストラクタの引数、「parent」は、processorオブジェクトを示すことになり、vtsはprocessorクラスで定義されたプラグインのパラメータ「parameters」を示すことになります。ここで、EditorであるGUIを紐づけています。processorからnewを行っていますので、一つのprocessorに対して複数のEditorを持つことができる、と以前のチュートリアルで学んだことがこのプログラムからも理解することができます。
resized関数とpaint関数の変更
resizedは、ウィンドウが初期化されるときと、プラグインウィンドウサイズが変更されたときに実行される関数です。また、paint関数は、GUIを描画する関数です。それぞれ、「PluginEditor.cpp」に実装されています。
resized関数は以下のようにしました。
void GainPluginAudioProcessorEditor::resized()
{
    //intにてEditorのサイズを返します。
    auto r = getLocalBounds();

    auto gainRect = r.removeFromTop(paramControlHeight);
    gainLabel.setBounds(gainRect.removeFromLeft(paramLabelWidth));
    gainSlider.setBounds(gainRect);

    invertButton.setBounds(r.removeFromTop(paramControlHeight));
}
setBounds関数は、それぞれのオブジェクトの位置とサイズを指定する関数になります。ここで、スライダーオブジェクトやボタンオブジェクトの位置とサイズを指定します。GUIの関数については、もう少しリファレンスを読み込んで理解していきたいと思います。ここでは、GUIオブジェクトの位置とサイズを設定しているという理解にとどめさせていただきますm__m
paint関数も以下のようにしています。
void GainPluginAudioProcessorEditor::paint (juce::Graphics& g)
{
    // (Our component is opaque, so we must completely fill the background with a solid colour)
    //g.fillAll (getLookAndFeel().findColour (juce::ResizableWindow::backgroundColourId));

    //g.setColour (juce::Colours::white);
    //g.setFont (15.0f);
    //g.drawFittedText ("Hello World!", getLocalBounds(), juce::Justification::centred, 1);
    //↓以下の、一行に変更しました。背景をバックグランドカラーに指定している色で塗りつぶすような処理です。
    g.fillAll(getLookAndFeel().findColour(juce::ResizableWindow::backgroundColourId));
}
動作検証
私は、windows環境のDAW「Reper」でVST3動作検証を行っています。
動作検証を行い、次のように動作することが確認できました。

今回動作させているプログラムは、以下のGitHubリモートリポジトリからcloneまたは、zipファイルにてソースコードをダウンロードすることが可能です。
git clone https://github.com/perfectpanda-works/GainPluginRefactoring.githttps://github.com/perfectpanda-works/GainPluginRefactoring.git

